How To Resize an Image on Your Windows PC or Mac
In today’s digital age, images play a crucial role in how we communicate and share information. However, there are often instances where the images we want to upload to the web exceed the file size limit, making it necessary to resize them. If you’re using a Windows PC or a Mac, there are several tools you can use to resize an image without needing to download any third-party software.

In this guide, we’ll show you how to resize an image using the Photos app and Paint on Windows, as well as Preview on Mac. So, stay tuned as we get started!
How to Resize an Image on Windows PC
If you’re using Windows PC, there are a couple of ways to resize an image on your computer. Let’s have a look at them below;
1. Using the Photos App:
The Photos app helps you resize an image effortlessly and it’s quite fast and straightforward. Here are the steps to follow;
- Open the image you want to resize using the Photos app (it should be the default option when opening an image).
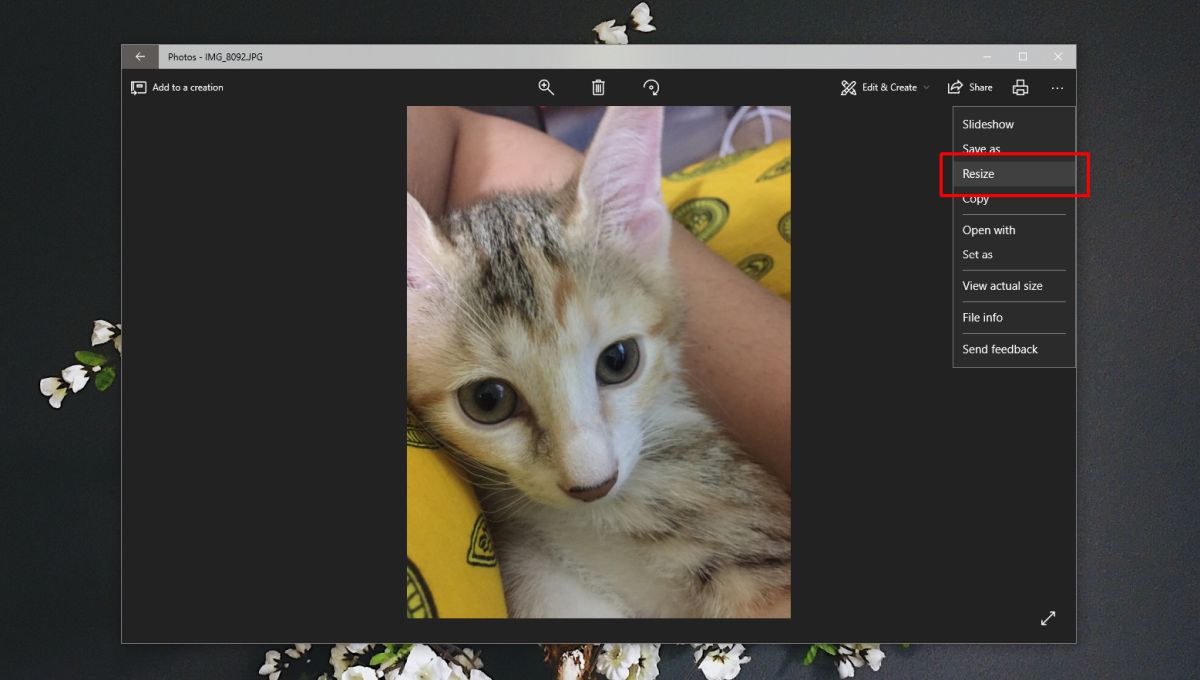
- Click the ellipsis button on the menu bar at the top, then click Resize.
- Enter the dimensions you want the image to have. You can see a preview of the final file size at the bottom of the window.
- You can also change the format of the resized image. If you choose .jpg you can also change the quality of the final image. The lower the quality, the smaller the file size.
- Save the image in a location of your choosing.
2. Using Paint:
An alternative option is Paint, which allows for the convenient resizing of images. Here are the steps to follow;
- In File Explorer, right-click the image you want to resize, and then choose Open with and then select Paint from the dropdown list.
- In the top menu bar, select the Resize option.
- You can choose to resize the image to a percentage of the original size or use absolute pixel values if you want a more specific size. You can click the chain button to choose whether you want to keep the original aspect ratio. Paint also gives you the option to skew the image if you want to distort it for whatever reason.
- Click OK to see the results.
- If you’re happy with the image, you can click the Save icon at the top of the window to update the original file. If you want to save a copy, click File then Save as and choose a different file name or location to save the new image in a separate file.
How to Resize an Image on Mac
If you’re using a Mac, you can easily resize images using the built-in app called Preview. However, it’s important to note that Preview will replace the original image files when you resize them. So, to keep the original files, make duplicates before resizing. With that in mind, follow the steps below;
- In Finder, open the image you want to resize. If Preview isn’t your default for opening images, right-click the image file, then choose Open with and select the Preview app.
- With Preview open, click the Tools option in the top menu bar, then choose “Adjust size.”
- You’ll see a window to choose the target size for your image. A few presets are available, but you can also choose a custom size. You can resize it by the percentage of the original resolution or switch to absolute values using the dropdown menu. You can also choose the pixel density of the final image if you prefer that method.
- Click OK and your image will be saved with the new resolution.
If you want to resize your images in bulk on a Mac, select all the images you want in Finder and open them with Preview. Then, in Preview, make sure you select the thumbnails for all the images you want to resize before using the Adjust Size option.
And that’s it! By using these built-in tools, you can quickly and easily resize your images without needing to download any additional software.
To get our latest news once they’re published, please follow us on Google News, Telegram, Facebook, and Twitter. We cover general tech news and are the first to break the latest MIUI update releases. Also, you get issues-solving “How To” posts from us.


