How to flash TWRP Recovery on POCO X3/NFC
POCO has already released as many phones this year as it did in the last two years. The company gained autonomy early this year and has gone to add some affordable flagship killer smartphones. They recently released the POCO X3 NFC, which is gradually taking over from the POCO F1 in terms of popularity.

The Poco X3/NFC is currently in the hands of so many people who continuously look for new ways to customize their phones. A few days ago, we made a guide on how to flash custom ROMs on the device, but it’s going to be a different guide today. In this post, we are looking at how to flash TWRP Recovery on POCO X3/NFC.
How to flash TWRP Recovery on POCO X3/NFC
Prerequisite
- PC
- ADB drivers
- Unlock the device Bootloader – Here
- Flashing TWRP toolkit
- Magisk flashable file
Note: this method is only for those that want to flash TWRP Recovery on POCO X3 NFC. You risk bricking your device if you try this on another device, not the karna/surya. Also, it takes 15 – 20 minutes for the device to boot after you complete the process.
Steps for flashing TWRP Recovery on POCO X3
- Download the TWRP toolkit – Here
- Boot the device into fastboot ( power off the device and then press the power + volume down button)
- Connect your device to the computer
- Head to the downloaded folder and run the file " Flash.bat".
- Press any key to continue
- The device will automatically boot into TWRP Recovery, which means you have flashed TWRP Recovery on POCO X3 NFC.
How to root Poco X3 NFC using magisk

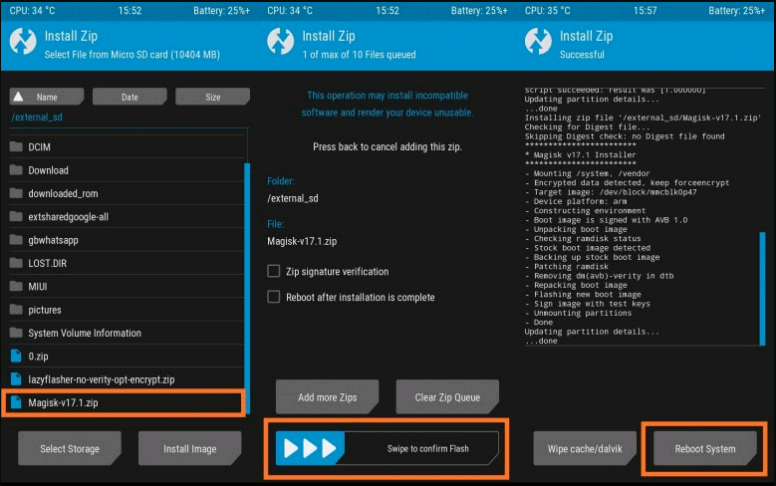
- Download and place the Magisk zip file into your device – Here
- Boot the device into TWRP Recovery by pressing the power + volume up button while the device is off.
- Select the install option and then access the directory where you have the Magisk zip and select
- Swipe the arrow located at the bottom to root POCO X3 NFC using magisk
- On completion, click on Reboot System
- After the phone has booted successfully, install magisk.apk
