How To Transfer Your Google Authenticator to a New Phone
Using Two-Factor Authentication (2FA) adds an extra layer of security to your Google Account. This feature generates a random key on your mobile device, enhancing the protection your password provides. However, when upgrading to a new phone, it can be challenging to transfer Google Authenticator codes and continue using 2FA.

In this guide, we will explore how to transfer Google Authenticator to your new phone. That ensures uninterrupted access to your accounts.
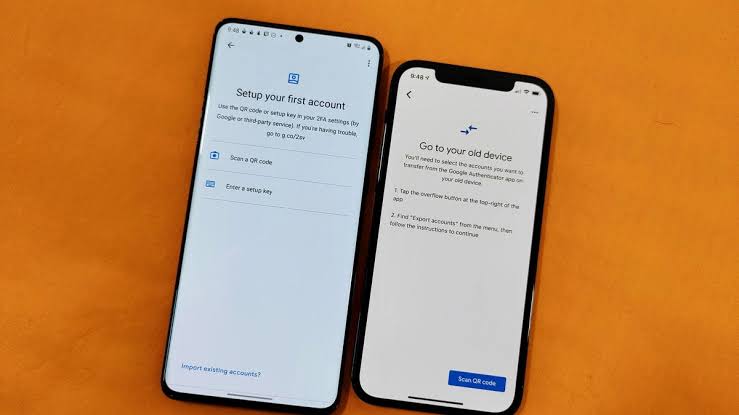
Transferring Google Authenticator from an Old Phone
To transfer your Google Authenticator codes from your old phone to a new one, carefully follow the steps below:
- First, preserve the Google Authenticator app on your old phone and avoid deleting it. This app will be necessary for an easy transfer of the codes.
- Install the Google Authenticator app on your new device. It can be downloaded for free from the Google Play Store.
- Launch the Authenticator app on your old phone.
- Tap on the three dots icon situated in the upper right-hand corner of the screen.
- Select “Transfer Accounts” from the menu options.
- Choose “Export Accounts.”
- Verify your identity as prompted to proceed.
- From the list of accounts, select the specific account information you wish to transfer.
- Tap “Next” to proceed.
- On your new phone, locate and tap the three dots icon, similar to the previous step.
- Select “Transfer Accounts.”
- Choose “Import Accounts.”
- Tap “Scan QR code.”
- Use your new phone’s camera to scan the QR code displayed on your old phone.
- Once scanned, tap “Done” on both devices to complete the transfer process.
What If I Lost My Old Phone or It Was Stolen?
Losing or having your phone stolen can be a distressing situation, particularly when accessing your accounts. To mitigate the risk of being locked out, consider the following backup options for account login:
Downloaded or Printed Backup Login Codes
- Log in to your account using the provided backup login codes.
- Keep in mind that each code can be used only once per login.
- Prioritize changing your authenticator device promptly.
- Follow the previously outlined steps to transfer the Google Authenticator app to your new device.
Second Step Verification Prompt
- Log in to your account using your password and the second-step verification method.
- Access the Two-Step Verification Enrollment Page.
- Scroll down and locate the security key associated with your old phone.
- Click on “Edit” next to the security key.
- Select “Remove This Key” and confirm the action.
- Install a new security key on your new phone by clicking “Add Security Key” and following the provided instructions.
No Second Step Verification or Forgotten Password
- Visit Google’s Account Recovery Page.
- Enter your account name and click “Next.”
- You will then be asked several questions to verify your identity.
Here are a few essential tips to remember when recovering an account:
- Try recovering your account from a device or location that you’ve used to log in before.
- If you have a backup email connected to the account, provide it.
- Include helpful details explaining the reason you are unable to access your account.
- Check your Spam folder for Google’s responses, which may occasionally end up there.
Note that resolving account recovery issues typically require three to five business days. Once you regain access to your account, follow the steps mentioned to reconfigure 2FA settings on your new device.
Final Words
Transferring Google Authenticator to a new phone is vital for maintaining account security during device upgrades. By following the steps above, you can effortlessly transfer Google Authenticator codes and continue benefiting from the enhanced security provided by 2FA.
To get our latest news once they’re published, please follow us on Google News, Telegram, Facebook, and Twitter. We cover general tech news and are the first to break the latest MIUI update releases. Also, you get issues-solving “How To” posts from us.


